
Thought I'd show a glimpse at some of the techniques I use in wire work, whilst also sharing a few tips with budding jewelry artists. This post looks at tempering (ie hardening) wire charms and findings, a technique I also sometimes apply to wrapping sea glass.
Simply working and shaping wire into a charm or finding automatically hardens it to a degree. However, the more pliable gauges (anything softer than 18g /1.0mm) really require more serious tempering. There are a couple of ways to do this. These include working it with nylon jaws pliers for mild effect or using a tumbler , which is an item I covet as it also polishes the wire for you. My favourite method is tapping with a rubber hammer.
 |
| Nylon jaws pliers for straightening, also has mild hardening effect |
I would use nylon jaws pliers for straightening out wire. As a bonus, they harden it somewhat in the process. You can also harden finished charms and findings by squeezing them with this pliers but it is nowhere as effective as a rubber hammer. Hammering lends good strength and rigidity to the metal. As a bonus, you may find that thwacking with a hammer is a good stress buster!!

You need an anvil or steel block and a hammer designed for the purpose. For tempering without flattening the wire, I use a standard double-ended rubber hammer. A very popular and not too expensive model comes with yellow and black ends. I bought mine here in my local supplier, Beads & Bling in Dublin but you can get the same one anywhere online from good craft suppliers. It's beginning to look a little worn with all the work I've been giving it but it is so simple to use and works like magic in a matter of seconds on silver plate/similar as well as solid silver.


Place the charm or finding flat on the block. Give it a few firm taps with the yellow end. No need to put all your strength into it, but do apply short, sharp raps.

I'm afraid it's a little difficult to photograph this using only one hand, but to add a little extra pressure and control, hold the hammer in your fist, with your forefinger extended along the handle and pointing to the head as shown. (Hmm, due to a spot of dry skin lately, my finger also looks as old and battered as the hammer today but how and ever, let's carry on....)
Follow up with a few hard taps with the black end.. Voila, your wire work is several times harder and less likely to bend out of shape.

It is not advisable to tap where wires cross over each other as this can have the opposite effect, creating a weak point in the work. I would use the hammer all the way round the curve on this earring hook, except at the start of the loop where the wires cross.
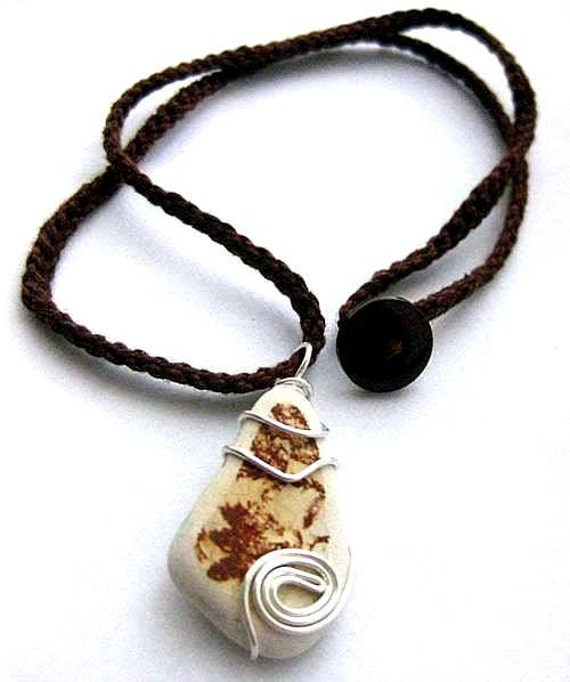 |
| Wire-wrapped sea pottery pendant |
I also use the hammer at certain points in the middle of wire-wrapping sea glass. It takes quite a bit of practice to learn when and where exactly to do this as you don't want to harden the wire to such a point that it wont bend the way you want it to go. For example, when making this sea pottery pendant, I formed the swirl in the middle of a length of wire, hammered only the swirl to temper it rigid. After slipping the swirl over the bottom of the shard, I proceeding with wrapping from either side and up to create the bail. After the usual bends and tweaks to tighten the wrapping to secure the piece, I hammered just the bail for hanging.

I use a chasing hammer when I want to flatten and spread the wire. Both hands are required to demonstrate the special technique for spreading the wire flat, as I hold it down with one hand and use repetitive fast strikes at an angle with the other hand . This one will have to wait for another blog post so...
The round end of the chasing hammer is good for creating or enhancing a dimpled texture, but that too, is a post for another day...
***
To see how to open jump rings the correct way, CLICK HERE. (Also of interest for non-jewelry artists for simple repair works!)
Click HERE for general handy tips from tea-dying lace to making herby ice cubes.
This comment has been removed by a blog administrator.
ReplyDelete